
Steve Pippin
Critical Analysis: Steven Pippin
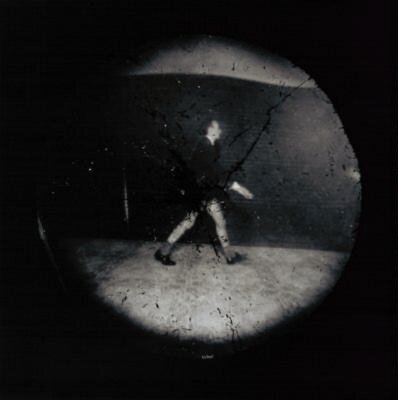
- In this photograph it looks like someone is in a tube station or a underground and is just walking past. It also looks like its a man without trousers.
- In the background i can see a wall of an underground? Or maybe its a abandoned building. The background is just a wall so doesn't give anything away of where it is.
- The image is circular because its pinhole photography.
- The marks on the surface on the photo may be because its a old camera or he edited it on to give a effect of old.
- The image has darker edges because its pinhole photography and Steve Pippin wanted that effect.
- I think the photographer made this by put a circular piece of paper or a box with a circular hole on the camera.
- If i could speak to the photographer i would ask him, where is it took and why was it taken?
Guide for Pinhole Camera.
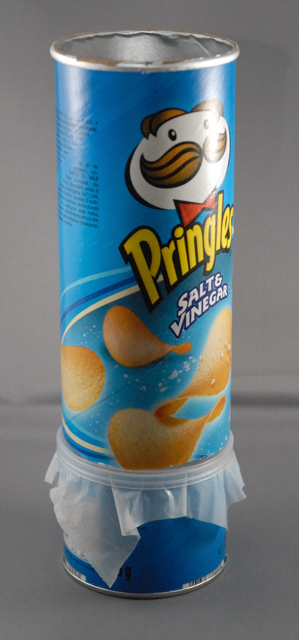
Things you will need: - A circular can with a metal bottom ie pringles, coffee can. Also with a plastic lid
-Foil
-Waxed Paper
-1 sheet of black construction paper
-Masking tape
-Straight Pin/thumbtack
-Ruler
-Marker
-Craft knife
-Foil
-Waxed Paper
-1 sheet of black construction paper
-Masking tape
-Straight Pin/thumbtack
-Ruler
-Marker
-Craft knife
Steps to make a pinhole camera.
1-Take the plastic lid off the can and wipe out the inside. (Save the lid!)
Draw a line with the marker all the way around the can, about 2 inches up from the bottom. Cut along that line so the tube is in two pieces.
2-The shorter bottom piece has a metal end. With the thumbtack/pin, make a hole in the center of the metal.
3-The plastic lid is going to be a screen. If your lid is clear, you may need to apply a piece of wax paper to the lid to act as a translucent screen.
Put the plastic lid onto the shorter piece. Put the longer piece back on top. Tape all the pieces together.
4-To keep light out of the tube, use a piece of aluminum foil that's about 1 foot long. Tape one end of the foil to the tube. Wrap the foil all the way around the tube twice, then tape the loose edge of the foil closed. If you have extra foil at the top, just tuck it neatly inside the tube.
How to use outside.
5-Once you have finished go outside, close one eye and hold the tube up to your other eye. You want the inside of the tube to be as dark as possible-so cup your hands around the opening of the tube if you need to. Look around outside through the tube. The lid makes a screen that shows you upside-down colour pictures.
6-Hold your hand below the tube and move it very slowly upward. Your hand is moving up, but you'll see its shadow move down the screen.